Thursday, November 23, 2017

Quick setup Phonegap Development Environment using Docker

INTRO


NOTE : Pre-requisite is to have ubuntu 16.04

Following DIGITAL OCEAN tutorial for same ... it worked for me on multiple machines
https://www.digitalocean.com/community/tutorials/how-to-install-and-use-docker-on-ubuntu-16-04

Lets start by insalling DOCKER

INSTALLATION COMMANDS :
1
2
3
4
5
6
curl -fsSL https://download.docker.com/linux/ubuntu/gpg | sudo apt-key add -
sudo add-apt-repository "deb [arch=amd64] https://download.docker.com/linux/ubuntu $(lsb_release -cs) stable"
sudo apt-get update
apt-cache policy docker-ce
sudo apt-get install -y docker-ce
sudo systemctl status docker

FIND, DOWNLOAD & RUN a relevant DOCKER image :
1
2
3
4
docker search phonegap
docker pull geekyhouse/phonegap-android-starter
docker images -a
docker run -i -t geekyhouse/phonegap-android-starter /bin/bash

Friday, September 1, 2017

Quick post: [termux] C and C++/Cpp code execution

Everybody here are the steps to start c/c++ coding in termux

1) Install package using following command

apt-get install clang

2) Sample C code
#include <stdio.h>                                                    int main(){                                        
printf("Hello World!");              
return 0;
}

3) Run using
gcc helloWorld.c

4) View output using
./a.out

5) Sample cpp/c++ code
#include <iostream>                                            using namespace std;                                          
int main() {
std::cout << "Hello, World!";
    return 0;                                         
}

6) Running cpp code
g++ helloWorl.cpp

7) View output using
./a.out

Wednesday, August 16, 2017

Quick Post : Vi Editor Basics (Dedicated to my dear siblings)

In terminal go to your desired filepath
Then type following command to start editing your file
vi filename.ext

This shall open the editor and you will see multiple lines with tilde(~) symbol

Next you will need to press i to start actually typing into file (untill then you are in read mode)

Now type your contents

Press esc and type :

This allows you to enter commands to vi editor
For saving and closing the editor you will type wq and press enter
To avoid saving you can type q!
Remeber when you press esc you again enter into readonly mode, and you can use arrow keys to move inside document.

Other main operations are
1) Copy
Go to line that you wish to copy
Press esc, Press yy to copy single line
Note: To copy 3 lines you can say y3y and so on

2) Cut
Go to line that you wish to cut
Press esc, Press dd to cut single line
Note: To cut 3 lines you can say d3d and so on

3) Paste
Go to line after which you wish to paste content from above two commands and press p

4) Search string
Press Esc
Type / followed by string you wish to find
Ex. /hello

.... Will add more as I recall

Tuesday, July 18, 2017

Quick Post : Yii Boostrap theme integration

For this you need to create a Yii project and then clone theme into its themes folder...

We need yii framework zip downloaded and extracted at some location and LAMP/MAMP/AAMP etc. preconfigured.


This can be done by using following commands

php yii-1.1.16/framework/yiic.php -webapp development/phpProjects/yii/boostrap3Theme

cd development/phpProjects/yii/boostrap3Theme/themes/

git clone https://github.com/amnah/yii-bootstrap-starter-theme.git

We need to configure the theme in configuration of app i.e. main.php located at protected/config/main.php location.

It does not have theme parameter added by default we need to configure it by adding 'theme'.

Before
return array(
 'basePath'=>dirname(__FILE__).DIRECTORY_SEPARATOR.'..',
 'name'=>'My Web Application',
 'theme'=>'yii-bootstrap-starter-theme',


After
return array(
 'basePath'=>dirname(__FILE__).DIRECTORY_SEPARATOR.'..',
 'name'=>'My Web Application',
        'theme'=>'[yii-bootstrap-starter-theme]',

Finally we need to setup up this config in views i.e. protected/views/layouts/main.php

<?php
        $bootstrapVersion = "3.0.0";
        $fontAwesomeVersion = "3.2.1";
        $jqueryVersion = "2.0.3";
        $queryUiVersion = "1.10.3";
?>


Reference: https://github.com/amnah/yii-bootstrap-starter-theme

Useful links:

  1.  XAMPP : https://www.apachefriends.org/download.html
  2.  WAMPP : http://www.wampserver.com/en/#download-wrapper
  3.  Yii Framework : http://www.yiiframework.com/download/


Friday, March 31, 2017

Getting started with GAE - Python on codenvy.io - Part 2

Continuing my earlier post here...


We had reached to a default application being created by codenvy as template to get started.
I will try to shade some light on this default application also share a backup of the source code for JUST IN CASE situations here.

Attached source code


Your workspace allows you to have multiple projects in it; we here are now looking at a sample that covers basics of app engine in one example.

During my learning curve all this application has was divided into seven steps now world being fast I believe this one shall suffice.

Running the application:
Your application is already coded ready to run with codenvy just click on source folder and press play you application shall start. There will be url at bottom shown in logs click on it to view your output.

DASHBOARD VIEW
 OUTPUT AFTER CLICKING ON LINK

List of concepts to look for to understand about source code:
  • Checkout app.yaml
    This file gives you entire configuration of your app including directory structure and URL mapping
  • Open and study guestbook.py
    This is your core logic study it thoroughly like an OOP case study (bottom up). All routing and business logic is mentioned. Study libraries needed to include
  • Concepts covered
    URL Pattern to Class mapping
    Handling requests
    Classes / Libraries in order for reference : Jinja, webapp2, ndb, and Users
  • Google plus social sign in and verification

Thursday, March 30, 2017

Getting started with GAE - Python on codenvy.io - Part 1

Recently I was helping a  fellow developer to get started with online IDE so that I can share my experience of developing with wonderful Google Cloud Eco System. As usual offline setups were complicated for entry level developer to get started so I decided to turn on to my till then favorite c9.io.

Now here's the problem, when will you corporates understand the epidemy of a student or starter level devloper looking for learning. C9.io has now made credit card verification mandatory for new users.

So here I am going forward with my then second now first favorite cloud IDE codenvy.io...


Steps to get started are now shared below.


  1. Sign in using github
  2. Enter details
  3. Dashboard looks like this
  4. Next find your GAE python option in the same page by scrolling
  5. Next enter your project / workspace details to get started
  6. And now you see your workspace starting up for first time with a simple project; which looks like this
  7. Now everything is setup and ready to roll: see you in follow up post

Wednesday, September 14, 2016

Git branching and merging [pending update]


kaustubh@kaustubh-desktop:$ git log --all --decorate --oneline --graph
*   a2.2.1.1 (HEAD, flappyChicken) hello world -> htmlWalaBranch -> 5 --> html5games --> flappyBirdGames --> flappyChicken, flappypig merging branches
|\  
| * a2.2.1.2 (flappyPig) hello world -> htmlWalaBranch -> 5 --> html5games --> flappyBirdGames --> flappyPig
* | a2.2.1.1 hello world -> htmlWalaBranch -> 5 --> html5games --> flappyBirdGames --> flappyChicken
|/  
* a2.2.1 (flappyBirdGames) hello world -> htmlWalaBranch -> 5 --> html5games --> flappyBirdGames
* a2.2 (puzzleGames, html5Games, 2dPhysicsGames, 2dBoardGames, 2dArcadeGames) hello world -> htmlWalaBranch -> 5 --> html5games
| * a2.1 (html5Webapps) hello world -> htmlWalaBranch -> 5 --> webapps
|/  
* a2 (html5WalaBranch) hello world -> htmlWalaBranch -> 5
| * b2 (cssframeworks) hello world -> cssWalaBranch -> cssframeworks
| | * b1 (cssCores) hello world -> cssWalaBranch -> cssCores
| |/  
| * b (cssWalaBranch) hello world -> cssWalaBranch
| | * a1 (html4WalaBranch) hello world -> htmlWalaBranch -> 4
| |/  
|/|   
* | a (htmlWalaBranch) hello world -> htmlWalaBranch
|/  
| * c (jsWalaBranch) hello world -> jsWalaBranch
|/  
* BASECODE (master) hello world

For simplification I have renamed commit codes to BASECODE, a,b,c etc. explaining each as follows:

Id
Commit Description
BASECODE
a
a1
a2
a2.1
a2.2
a2.2.1
a2.2.2.1
a2.2.2.2
a2.2.1.1
b
b1
b2
c

Kompozer install(ubuntu) and quick review

Ubuntu Kompozer install command:

sudo apt-get install kompozer
Official website : Click Here

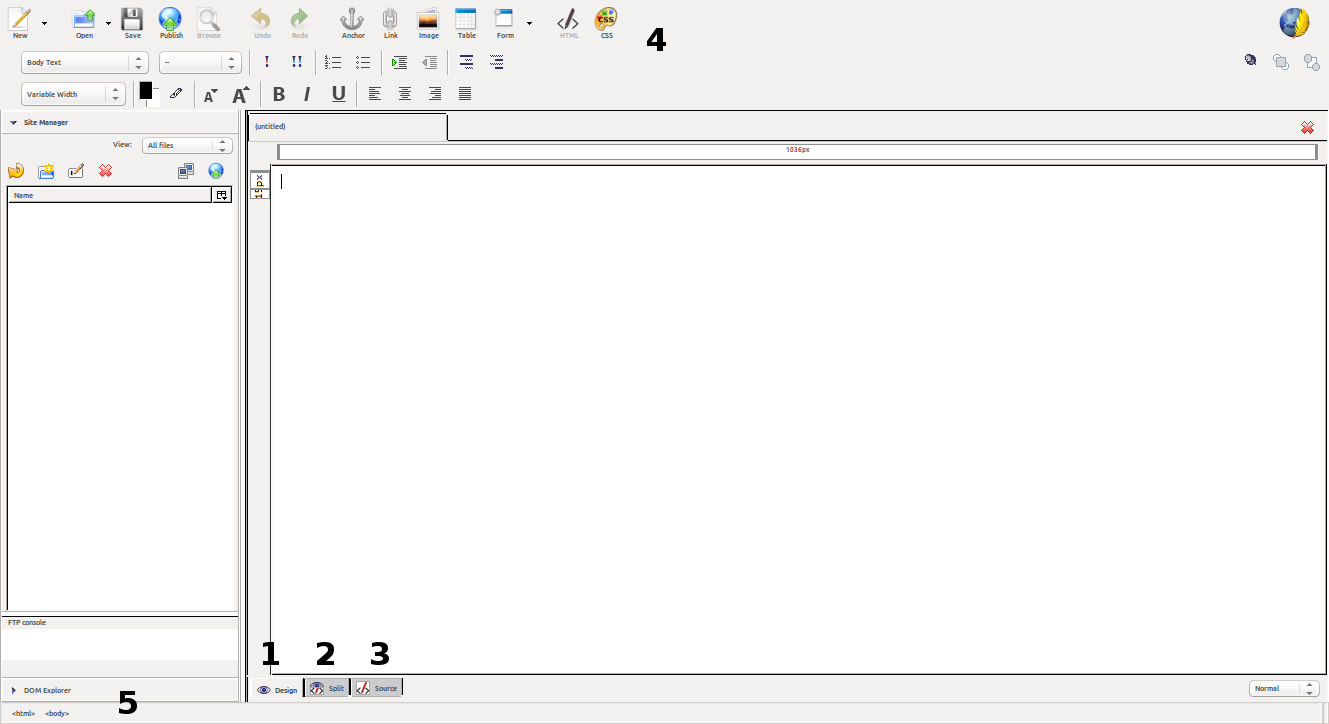
After installation on opening Kompozer you will see a tooltip which you can ignore to continue. Next screen shall be as follows, I am numbering items in image to explain them in short in table that follows:

First Screen on opening Kompozer

As a beginner, one should be acquainted with these 5 options at first.
Item Code Short Description
1 Design View : Potrays output as you will see, this is also a WYSIWYG editor where you can directly start editing and relevant HTML witll be generated
2 Split View: Here you see part of HTML  code at bottom of screen and design on top so that you can edit any to get the desire look and feel
3 HTML view: HTML is complete source code view of document with code highlighting functionality for web developer
4 Quick access menu: You are provided with mostly used items on the top so that you can add edit delete most used HTML tags easily. Most of them also have wizard to help you figure out what is to be done
5 DOM explorer: Have you ever imagined a tree with branches and sub branches to its twigs. Well HTML document follows that kind of structure where in everything is inside html tag but could be explored in tree like structure using DOM explorer


You can use this tutorial as base and try to design a webpage in this another post as a start : Next post

Friday, September 9, 2016

Posting my experience with Logitech K480


How did I get it?
I was like always checking out deals on different sites, just when this lightning deal(amazon) caught my attention which said K480 for 1899INR and I knew I had never seen this any less 2500 on different occasions so I had to book it :P
Unexpectedly delivery charges were free and it said will be delivered in two days but got delivered the next day!
Initial impressions (day 1: more like working day 1)
First of all its heavy but I guess it gives it sturdy ness.
Setup with android devices was pretty easy just for new buyers if asked for pin type it using keyboard and press enter it works that way.
The main problem I faced was with windows. Initially it connected like a charm and I did some shortcuts and it worked but once I changed device using keyboard; windows 7 setup was dead! No matter what I do it was dead. I tried remove device and that caused me to hit a dead end - now keyboard is not even shown in search new device.
PS: I have done driver uninstall/ install, couple of reboots, service log on changes, registry key changes for that sake; its still a dead end for K480 with win7.
Hoping to find a solution soon.
Impressions continued day 2
Keyboard gave me hard time today connecting to my phone, actually my phone was the only device which accepted it how it was in no time. I turned on my phones bluetooth and then turned on keyboard, it didn't connect on itself. I thought it might be some sequence issue so I switched between devices still same. I had to search and add this keyboard to phone again.
I wonder what went wrong between these two :P
Note for readers: This post is posted from my Lenovo K3 Note and my brand new Logitech keyboard K480 (which i haven't paid for it yet :P)

Friday, September 2, 2016

Quick shell based network setup [linux]

By default most linux OS have their network config set to DHCP. How to change it and get going with custom settings.

This is what DHCP setting looks like
auto eth0
iface eth0 inet dhcp

For same we need to edit interfaces file as following:

sudo vi /etc/network/interfaces
Contents of file considering we are editing for eth0 card
auto eth0
iface eth0 inet static
address 192.168.2.1
netmask 255.255.255.0
gateway 192.168.X.X
dns-nameservers X.X.X.X Y.Y.Y.Y Z.Z.Z.Z

After saving above configuration we need to restart networking service to apply changes
 sudo /etc/init.d/networking restart

Checking of new configuration can be done as follows
$ ifconfig eth0
$ ifconfig

Thursday, September 1, 2016

Navigation / Menu (Dynamic) using bootstrap

Point to be noted is that bootstrap has already taken care of different screens so when you are coding the bootstrap page its dynamic to screen size. This post covers one  of such amazing example where you design a navigation for large screen and it automatically becomes collapsible for mobile screens.

Here is the code,

 1
 2
 3
 4
 5
 6
 7
 8
 9
10
11
12
13
14
15
16
17
18
19
20
21
22
23
24
25
26
27
28
29
30
31
32
33
34
35
36
37
38
39
40
41
42
43
44
45
46
47
48
49
50
51
52
53
54
55
56
57
58
59
60
61
62
63
64
65
66
67
68
69
70
71
72
<!DOCTYPE html>
<html lang="en">

<head>
  <meta charset="utf-8">
  <meta http-equiv="X-UA-Compatible" content="IE=edge">
  <meta name="viewport" content="width=device-width, initial-scale=1">
  <title>Navigation Example</title>
  <link href="https://maxcdn.bootstrapcdn.com/bootstrap/3.3.6/css/bootstrap.min.css" rel="stylesheet">
  <script src="http://code.jquery.com/jquery-latest.min.js" type="text/javascript"></script>
  <script src="https://maxcdn.bootstrapcdn.com/bootstrap/3.3.6/js/bootstrap.min.js"></script>
</head>

<body>
  <nav class="navbar navbar-default">
    <!-- inverse to have black -->
    <div class="container-fluid">
      <div class="navbar-header">
        <button type="button" class="navbar-toggle collapsed" data-toggle="collapse" data-target="#bs-example-navbar-collapse-1" aria-expanded="false">
        <span class="sr-only">Toggle navigation</span>
        <span class="icon-bar"></span>
        <span class="icon-bar"></span>
        <span class="icon-bar"></span>
      </button>
        <a class="navbar-brand" href="#">
          <!-- <img alt="Brand" src="..."> -->
          Brandname
        </a>
      </div>
      <div class="collapse navbar-collapse" id="bs-example-navbar-collapse-1">
        <ul class="nav navbar-nav">
          <li class="active"><a href="#">Link <span class="sr-only">(current)</span></a></li>
          <li><a href="#">Link</a></li>
          <li class="dropdown">
            <a href="#" class="dropdown-toggle" data-toggle="dropdown" role="button" aria-haspopup="true" aria-expanded="false">Dropdown <span class="caret"></span></a>
            <ul class="dropdown-menu">
              <li><a href="#">Action</a></li>
              <li><a href="#">Another action</a></li>
              <li><a href="#">Something else here</a></li>
              <li role="separator" class="divider"></li>
              <li><a href="#">Separated link</a></li>
              <li role="separator" class="divider"></li>
              <li><a href="#">One more separated link</a></li>
            </ul>
          </li>
        </ul>
        <form class="navbar-form navbar-left" role="search">
          <div class="form-group">
            <input type="text" class="form-control" placeholder="Search">
          </div>
          <button type="submit" class="btn btn-default">Submit</button>
        </form>
        <ul class="nav navbar-nav navbar-right">
          <li><a href="#">Link</a></li>
          <li class="dropdown">
            <a href="#" class="dropdown-toggle" data-toggle="dropdown" role="button" aria-haspopup="true" aria-expanded="false">Dropdown <span class="caret"></span></a>
            <ul class="dropdown-menu">
              <li><a href="#">Action</a></li>
              <li><a href="#">Another action</a></li>
              <li><a href="#">Something else here</a></li>
              <li role="separator" class="divider"></li>
              <li><a href="#">Separated link</a></li>
            </ul>
          </li>
        </ul>
      </div>
    </div>
  </nav>
  <h1>Hello, world!</h1>
</body>Example

</html>

Output:
DESKTOP/ LARGE SCREEN 
Desktops/ Large screen devices
MOBILE/ SMALL SCREENS 

Explanation:

Note that I have intentionally included jquery before bootstrap js inclusion becoz if not done so dynamic navigation fails to expand and collapse 

Line 15: If you change navbar-default to navbar-inverse you shall have dark theme
Line 25: href value defines what is to be done when clicked on Logo or brand name
Line 26: uncomment it and set company logo here if you want

Layout / Grid system in Bootstrap

Bootstrap divides page as mainly usable and not used part by mentioning class name as container for div tag.All the content we need to show is inside this div tag


This container is then divided into 12 equal parts indicating a block of layout. Basic concept of layout is a tabular structure. But tables have drawbacks in layout as we cannot overlap table on each other and it is very strict with columnar and row-wise structure.


Here bootstrap we use this 12 parts scheme to layout our visual components in a div with class name row
and each unit we show has class name starting with col-[+]-[*]
Note:
[+] here indicates values as lg(large screen), md(lappy/desktop), sm(tablet), xs(mobile)
[*] here indicates value from 1 to 12


One thing to understand here is that the value you set for one component should be either 12 or components in row(div) should addup to 12


Lets say layout we wish is two column for desktop display the code will look like


1
2
3
4
<div class="row">
  <div class="col-md-8"></div>
  <div class="col-md-4"></div>
</div>


This will divide page to give output somewhat like in image below:


Getting started with bootstrap [setting up]

CDN URL
CSS: https://maxcdn.bootstrapcdn.com/bootstrap/3.3.6/css/bootstrap.min.css
JS   : https://maxcdn.bootstrapcdn.com/bootstrap/3.3.6/js/bootstrap.min.js

index.html source code


 1
 2
 3
 4
 5
 6
 7
 8
 9
10
11
12
13
14
15
<!DOCTYPE html>
<html lang="en">
  <head>
    <meta charset="utf-8">
    <meta http-equiv="X-UA-Compatible" content="IE=edge">
    <meta name="viewport" content="width=device-width, initial-scale=1">
    <title>Hello World Example</title>
    <link href="[css cdn url/relative path]" rel="stylesheet">
    <script src="[js cdn url/relative path]"></script>
</head>
    <body>
        <h1>Hello, world!</h1>
        <script src="https://ajax.googleapis.com/ajax/libs/jquery/1.11.3/jquery.min.js"></script>
    </body>Example
</html>

Ńote:
On line no. 8 and 9 you can replace the CDN url mentioned above or download files and set relative path to source code.

Git go to any moment (commit) in time

Get this straight you are accessing repo thats already setup and has commits branches etc in it


Here's how you go to any period of commit in a repo status
Git repo url :  https://github.com/thatsmekaustubh/appengine.git
You start by cloning it in your working directory

git clone https://github.com/thatsmekaustubh/appengine.git 004appengine


To know all commits you can find it using this command

git log


To know all branches you can find it using this command

git show-branch -a


This shall give a picture of all flows of development
this in present moment of time is

start__masterBranch
      |__experimentsBranch

Commits were

  • false commit (hello world example)
  • Hello world example with commmand to run
  • Users API example 
The command shows
git log
all commit id's
You can switch between branches as
git checkout <branchname>

And go to particular commit by saying 

git checkout <commitid>

Github getting started

Account Part:
Signup to github and then login
once logged in you will see my repo in which you should click on Create New Repository
    Fill in details and say create
On the machine you wish to code and submit changes to github you need a SSH key setup on both peers (mentioned in another tutorial)


Coding Part:
Say,
git init 
on your code whereever it is

Code your files (Note: that you are on master right now) [detailed post on branching and merging]

To add all changes say
git add --all
(this stages all non-committed files)

To commit say,
git commit -m 'Your message for the commit'


Syncing part:
You might want to sync this changes to github website so,
Type this 
git remote add origin https://github.com/<username>/<reponame>.git


To send commit to server type
git push --all


This shall get your code on git hub open repository to be shared with all

Thursday, August 25, 2016

Hello world | Google App Engine | Python | Cloud9IDE (EDIT REQ)


Create following files in a directory by name helloWorld
           this setup is public on c9.io; to see click here
main.py
 1
 2
 3
 4
 5
 6
 7
 8
 9
10
11
import webapp2


class MainPage(webapp2.RequestHandler):
    def get(self):
        self.response.headers['Content-Type'] = 'text/plain'
        self.response.write('Hello, World!')

app = webapp2.WSGIApplication([
    ('/', MainPage),
], debug=True)


main_test.py
 1
 2
 3
 4
 5
 6
 7
 8
 9
10
11
12
import webtest

import main


def test_get():
    app = webtest.TestApp(main.app)

    response = app.get('/')

    assert response.status_int == 200
    assert response.body == 'Hello, World!'


app.yaml
1
2
3
4
5
6
7
runtime: python27
api_version: 1
threadsafe: true

handlers:
- url: /.*
  script: main.app


Run your project as follows :
python googleAppEngineSDK/google_appengine/dev_appserver.py --host $IP --port 8081 --admin_host $IP --admin_port 8082 projects/helloWorld

Setting up c9.io (ubuntu) with Google App Engine SDK - PYTHON

I try to cover as much of steps required as possible in my posts but dont include them all in one post so that one doesnt get bombarded with information. Please refere to pre-requisite section with reference sufficient for you; if it doesnt exist please mention so in comment.


Pre-requisite :
c9.io account
Create a workspace with Python Config

STEPS:
Go to shell copy paste one at a time
STEP(1) Get SDK from Google to you c9.io workspace
wget https://storage.googleapis.com/appengine-sdks/featured/google_appengine_1.9.40.zip
STEP(2) Unzip the sdk package
unzip google_appengine_1.9.40.zip
STEP(3) Set path variable for future reference
export PATH=$PATH:/home/ubuntu/workspace/googleAppEngineSDK/google_appengine/


Reference : Google Docs

Creating Sheet using Google Drive Excel (Shared Manner)

Step 1 Go to drive.google.com
You need to login using your google account (xyz@gmail.com/ xyz@company.com)
Step 2 Click on new and select sheets
Step 3 Set any name at top where it says Untitled sheet and press save
Step 4 Next click on share to share it with any email id.
Note: In case you are using company email id you can only share the document with other emails within company domain ex. xyz@company.com can share it with someone like abc@company.com and not abc@gmail.com (mostly.. exceptions can be added by company google account admin)
Share can be done in one of three manner :
  1. readonly : where in other user can only read the document contents
  2. comment : where in other user can read and comment on the document contents
  3. edit : where in other user can read, commment edit the document contents
There can be one more option for sharing sheet publicly with one of the above three manner. Which means any one with link can perform that specified operations. To do so you simply need to copy and message URL to your contact

Monday, August 17, 2015

Review Lenovo Note K3

Hey there folks, its been a week now for me using my new mobile Lenovo Note K3 and here is my feedback about it as a regular IT guy.

This phablet pretty much sums it all, you get a descent screen size and great computing power to do your daily tasks. Especially for guies like me there is a gud news you can comfortably code, read, watch videos and play games. Lenovo has taken a gud effort designing this phone keeping it sleek and yet functional not to forget at a reasonable price.

Heating problem? You must be a die hard gamer to face this issue. So far I barely experienced any heating issue, but when I did it was in top center on back of device (when I was not using any case)

Full HD is a real delight! I am enjoying watching my favorite videos on this device. Sound quality is pretty gud and obviously if you need to rock your house with sound you need a speaker it isn't the fault of device manufacturers that they haven't housed a home entertainment system in your mobile. I have enjoyed songs in room full of 15 people partying, on local station, on the road and other crowded places full of noise and quality is satisfactorily audible in adverse situations.

Camera on both front and rear are delight, we took a selfie in theatre which explains it all.

Functionalities
As a developer: Yes I am coding with this device, not just coding I am building  websites, and apps with this device. So you get the idea college students and lite coders.
As a commuter: Except for Virar Locals from Mumbai I can call this phablet as a handy device, to check schedules, read feeds, books, papers play games. Your hands wont get tired that easily.
As a reader: I haven't finished any book yet but have read a couple of journal papers on this device and it was comfortable.
As a Mobile User: I know its crazy but I am getting better cell reception at all places, this was unexpected from any smartphone as I always had to search and re search and choose network 4 times a day!

Bottom line: If you are any one else then a die hard gamer or a graphic designer (who draw - which needs stylus) or a person spending most of the time on voice calls this is a phablet/ smartphone for you; and trust me it cant go any better at this pricing.

Friday, May 1, 2015

Is there an app for that?

This is my first post in the series is there an app for that series of post !

What got me thinking is I know lot of technology stuff I use a latest android tablet compatible with pretty much every single app available there (obviously not all apps) and I face many odd needs with this tablet I use.

So I have decide to write a review of app that I use or come across and define its application.

Cheers to a new beginning!

Quick setup Phonegap Development Environment using Docker

INTRO NOTE : Pre-requisite is to have ubuntu 16.04 Following DIGITAL OCEAN tutorial for same...